
專題 - 使用 git 進行版本控制 - 多人共同開發之容器設定
上次更新日期 2020/10/04
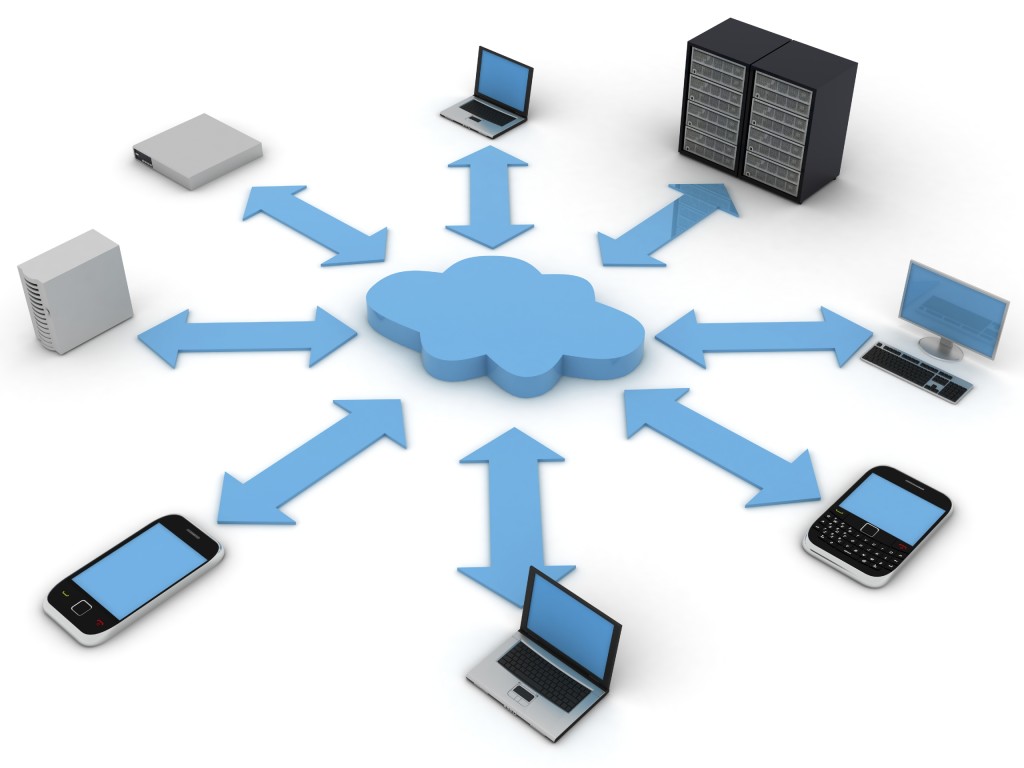
前面提到的 git 使用的方式,大部分是在本機上面,自己一個人獨立開發軟體/網頁/其他工作的流程, 那如果你有需要進行多人共同開發的行為時,該如何處理?這就是一般使用 GitHub 的緣由!不過,或許因為某些機密開發, 你需要將 Server 放置在公司內部進行開發,這時,自己處理一部內部網路來管理,可能會是一個比較好的作法。 我們這裡提供一個簡單的內網 ssh 協同開發的專案範本,讓多人可以同時進行同一個專案的開發。
建立裸容器的權威容器
事實上,我們前面的章節談到的 git 操作,都是屬於本機的『開發容器』,意思是,我可以在這個容器內自由的開發、分支、合併、刪除等。 但是,畢竟這只是單一個人在某個目錄內的自由開發,對於小型專案來說,還不成問題。但是對於大型專案來說,可能就會產生部份的狀況! 例如,你願意讓某些人進入你的開發目錄惡搞嘛?可能會損壞到你原本的開發行為啊!
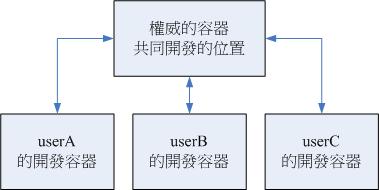
所以,一般來說,如果在同一部系統上面進行開發時,大家還是習慣在自己的開發容器進行發展,等到發展的差不多, 再將程式馬上傳/下載到某個統一管理的地方,這樣,就可以保有獨立開發,並且在統一管理的位置上面進行送交、合併的行為! 這對於需要不同團隊合作開發的較大型專案來說,是相當重要的!
- 幾個常見的基本名稱:
- 開發容器:
所謂的開發容器,就是開發目錄底下具有軟體檔案的環境,那就是開發容器。一般來說,在專案目錄底下具有 .git 隱藏目錄的,那就是開發容器!我們前面的章節所建立的容器,無論是 git clone 產生,還是 git init 產生的, 都屬於這一類型!在該目錄底下,可以進行開發、送交、合併等任務。 - 裸容器:
例如上面的圖示,那個所謂的『權威容器』,通常指的就是裸容器。裸容器目錄底下並沒有 .git 隱藏目錄, 你可以說,裸容器本身就是 .git 底下的資料!也就是說,裸容器本身不含檔案結構,而主要是紀錄該專案內的所有變動。 這個裸容器可以讓使用者使用 git push, git pull 等任務。
- 開發容器:
- 觀察裸容器與開發容器:
- 兩個容器的初始化方式差異在 --bare 而已:
# cd /dev/shm
# git init proa
Initialized empty Git repository in /dev/shm/proa/.git/

# ll -a proa/
drwxr-xr-x. 3 root root  60 10月  3 23:25 .
drwxrwxrwt. 3 root root  60 10月  3 23:25 ..
drwxr-xr-x. 7 root root 200 10月  3 23:25 .git
# 你會看到,這就是所謂的開發容器,在該目錄底下有個 .git 的隱藏目錄存在!

# git init --bare prob
Initialized empty Git repository in /dev/shm/prob/

# ll -a prob
drwxr-xr-x. 7 root root 200 10月  3 23:28 .
drwxrwxrwt. 4 root root  80 10月  3 23:28 ..
drwxr-xr-x. 2 root root  40 10月  3 23:28 branches
-rw-r--r--. 1 root root  66 10月  3 23:28 config
-rw-r--r--. 1 root root  73 10月  3 23:28 description
-rw-r--r--. 1 root root  23 10月  3 23:28 HEAD
drwxr-xr-x. 2 root root 260 10月  3 23:28 hooks
drwxr-xr-x. 2 root root  60 10月  3 23:28 info
drwxr-xr-x. 4 root root  80 10月  3 23:28 objects
drwxr-xr-x. 4 root root  80 10月  3 23:28 refs
# 這就是裸容器!你會發現到 prob/ 目錄內,幾乎就是 .git 的內容!所以不能直接在此開發!
- 如果你已經具有一個個人開發的開發容器了,可不可以分享出來成為裸容器呢?
可以的,也同樣是透過之前談到的 clone 即可!我們以之前玩弄許久的 /var/www/html 來做介紹:
# cd /dev/shm
# git clone --bare /var/www/html myhtml.git
Cloning into bare repository 'myhtml.git'...
done.

# ll myhtml.git/
drwxr-xr-x.  2 root root  40 10月  3 23:32 branches
-rw-r--r--.  1 root root 105 10月  3 23:32 config
-rw-r--r--.  1 root root  73 10月  3 23:32 description
-rw-r--r--.  1 root root  23 10月  3 23:32 HEAD
drwxr-xr-x.  2 root root 260 10月  3 23:32 hooks
drwxr-xr-x.  2 root root  60 10月  3 23:32 info
drwxr-xr-x. 49 root root 980 10月  3 23:32 objects
-rw-r--r--.  1 root root 325 10月  3 23:32 packed-refs
你會發現到, /dev/shm/myhtml.git 已經成為一個裸容器,可以提供許多人來共同參照、開發了。 - 一般命名:
一般約定俗成的情境下,我們會將裸容器的目錄名稱取為 xxx.git,雖然是非必備,不過,既然目前大家都這樣設定, 那就依據網路的習慣來定義比較好!
- 兩個容器的初始化方式差異在 --bare 而已:
- 建立權威容器所在的權限思考
- 建立者的身份:其實,使用 root 的身份來進行 git 的處理,是件很笨的事!因為,事後許多的資料處理都會出問題! 所以,建立者的身份最好是團隊內的一般帳號會比較好!否則,至少以 root 建立完成後,還是先處理權限問題, 然後在通知團隊成員較佳!否則可能經常會發生某些成員無法進行上傳/下載的困擾。
- 權限規劃:其實,最好是將共同開發者加入到同一個 Linux 群組內,這樣比較好規劃其權限。 如果某些限制導致某些帳號無法加入該群組,可能就得要用到 ACL 權限控制的行為了。
- 一個範例:
共同群組: mypro
使用者群: prousera, prouserb, prouserc

額外用戶: student
開發者目錄: /srv/myproject/
- 建立所需要的群組、帳號與密碼等資料
# groupadd mypro
# useradd -G mypro prousera
# useradd -G mypro prouserb
# useradd -G mypro prouserc
# id prousera
uid=1001(prousera) gid=1002(prousera) groups=1002(prousera),1001(mypro)

# echo "prousera" | passwd --stdin prousera
# echo "prouserb" | passwd --stdin prouserb
# echo "prouserc" | passwd --stdin prouserc
上面是一個很爛的範例,暫時將帳號與密碼設定為相同!事實上這是很不智的!我們目前是在測試, 請不要在公開的系統上面這樣做。 - 建立所需要的目錄與修改權限:
# cd /srv
# mkdir myproject
# chgrp mypro myproject/
# chmod 2775 myproject/
# ll -d myproject/
drwxrwsr-x. 2 root mypro 6 10月  3 23:51 myproject/

# setfacl -m u:student:rwx myproject
# setfacl -m d:u:student:rwx myproject
# getfacl myproject/
# file: myproject/
# owner: root
# group: mypro
# flags: -s-
user::rwx
user:student:rwx
group::rwx
mask::rwx
other::r-x
default:user::rwx
default:user:student:rwx
default:group::rwx
default:mask::rwx
default:other::r-x
這樣,在 /srv/myproject/ 目錄底下,你要如何新建不同的專案,都可以被接受了! - 新建檔案的預設權限: umask
另外,最好規範一下你的用戶,在操作系統前,先將 umask 切換到 002 較佳!# vim ~/.bashrc umask 002 # source ~/.bashrc # umask 0002
- 實際建立權威裸容器:
- 以 student 身份,以 /var/www/html 這個專案為來源,將權威容器放置於 /srv/myproject/roothtml.git 專案內
# su - student
$ cd /srv/myproject
$ git clone --bare /var/www/html roothtml.git
Cloning into bare repository 'roothtml.git'...
done.
- 以 student 身份,建立空的裸容器,名為 /srv/myproject/roothtml2.git 專案
$ cd /srv/myproject
$ git init --bare roothtml2.git
Initialized empty Git repository in /srv/myproject/roothtml2.git/
- 以 student 身份,以 /var/www/html 這個專案為來源,將權威容器放置於 /srv/myproject/roothtml.git 專案內
- 以權威容器建立自己本地的開發容器:
- student 之前已經建立過 ~/www 目錄,這個目錄比較舊,我們先將它刪除,然後以權威容器來直接建立 student 的開發容器:
$ cd ~
$ rm -rf www
$ git clone /srv/myproject/roothtml.git/ www
Cloning into 'www'...
done.

$ cd www
$ git log
commit 20a16c25d5876d0a9fcb034bffa4f63d92920bd2 (HEAD -> master, origin/master, origin/HEAD)
Merge: 9b3ee0f aa8808e
Author: VBird Tsai <dmtsai@mail.ksu.edu.tw>
Date:   Sat Oct 3 07:56:23 2020 +0800

    Merge branch 'hw/unit2'
.....
很有趣的是,第一行最新的 commit 右側顯示了除了 HEAD 是 master 之外,也還有另外兩個名稱! 最重要的應該就是 origin/master 了!這就是遠端容器的名稱! - 列出本地開發容器的遠端參照容器方式: git config --list
$ git config --list
user.name=VBird Tsai
user.email=student@localhost
core.repositoryformatversion=0
core.filemode=true
core.bare=false
core.logallrefupdates=true
remote.origin.url=/srv/myproject/roothtml.git/
remote.origin.fetch=+refs/heads/*:refs/remotes/origin/*
branch.master.remote=origin
branch.master.merge=refs/heads/master
- 如果你想要在新建的新開發容器裡面增加 roothtml.git 專案,也可以這樣做:
$ cd ~
$ git init www2
$ cd www2
$ git remote add origin /srv/myproject/roothtml.git
$ git remote update
Fetching origin
remote: Enumerating objects: 44, done.
remote: Counting objects: 100% (44/44), done.
remote: Compressing objects: 100% (33/33), done.
remote: Total 44 (delta 14), reused 0 (delta 0)
Unpacking objects: 100% (44/44), done.
From /srv/myproject/roothtml
 * [new branch]      hw/unit1   -> origin/hw/unit1
 * [new branch]      hw/unit2   -> origin/hw/unit2
 * [new branch]      master     -> origin/master
 * [new tag]         V0.2       -> V0.2

$ git branch -a
  remotes/origin/hw/unit1
  remotes/origin/hw/unit2
  remotes/origin/master
這個 update 的功能,只是更新了 .git 的內容,因此,目前目錄下還是沒有任何資料!而使用了 git branch -a, 就可以列出來遠端 origin 的分支名稱了!現在,讓我們將遠端容器的 master 最新的資料抓下來!$ git pull origin master From /srv/myproject/roothtml * branch master -> FETCH_HEAD $ ll -rw-rw-r--. 1 student student 192 Oct 4 00:43 index.html -rw-rw-r--. 1 student student 21 Oct 4 00:43 phpinfo.php -rw-rw-r--. 1 student student 141 Oct 4 00:43 server.php drwxrwxr-x. 2 student student 24 Oct 4 00:43 unit1 drwxrwxr-x. 2 student student 24 Oct 4 00:43 unit2 $ git log ....
這樣就將我們需要的檔案資料抓下來了!雖然步驟比較繁複,不過,可以更清楚整體流程的!
- student 之前已經建立過 ~/www 目錄,這個目錄比較舊,我們先將它刪除,然後以權威容器來直接建立 student 的開發容器:
- 實做練習:
- 以 prousera 的身份,建立 git config --global user.email 與 user.name 的設定值!
- 以 prousera 的身份,建立權威裸容器,參照來源為 /var/www/html 目錄,且裸容器網址為 /srv/myproject/userahtml.git
- 以 prousera 的身份,建立開發容器,參照來源為 /srv/myproject/roothtml.git 目錄,且本地開發容器位於 ~/www。
- 以 prousera 的身份,先於 ~/www2 當中初始化 git 容器,然後設定遠端參照容器為 /srv/myproject/userahtml.git, 接下來請自行進行其他相關指令,最終 ~/www2 的內容會是 /srv/myproject/userahtml.git 的最新的 master 結構。
本地開發容器與遠端容器的推播
製作權威的容器目的就是在多人共用開發,但是我們無法直接在權威容器裡面進行送交的任務,反而需要透過 git pull, git push, git fetch 等指令進行資料的下載與上傳!那麼你應該要知道的是,權威容器、本地端容器、本地端暫存資料,以及本地端目錄的資料當中, 相關的指令關係如何分辨?其實簡單的說,可以參考底下的圖示 (圖示來源請參考文末的參考資料,感謝 Badu Huang):
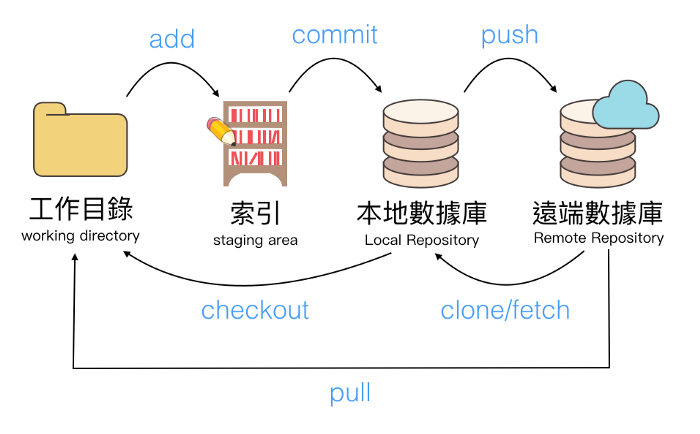
前兩章的內容只在本地端,因此你可以知道,上圖左側的三個部份 (工作目錄、索引、本地端容器) 就是本地的開發容器, 因此我們只會用到 git add, git commit, git checkout 等。如果加上權威容器,那麼接下來的任務,就會加上 git push 與 git pull 等任務。 如果對於各個指令之間的相關性探討,可以參考文末高見龍先生撰寫的『 Git 面試題』相關說明。如果對於其他用過的指令相依性, 則可以參考下圖 (下圖來自 git wiki 說明)
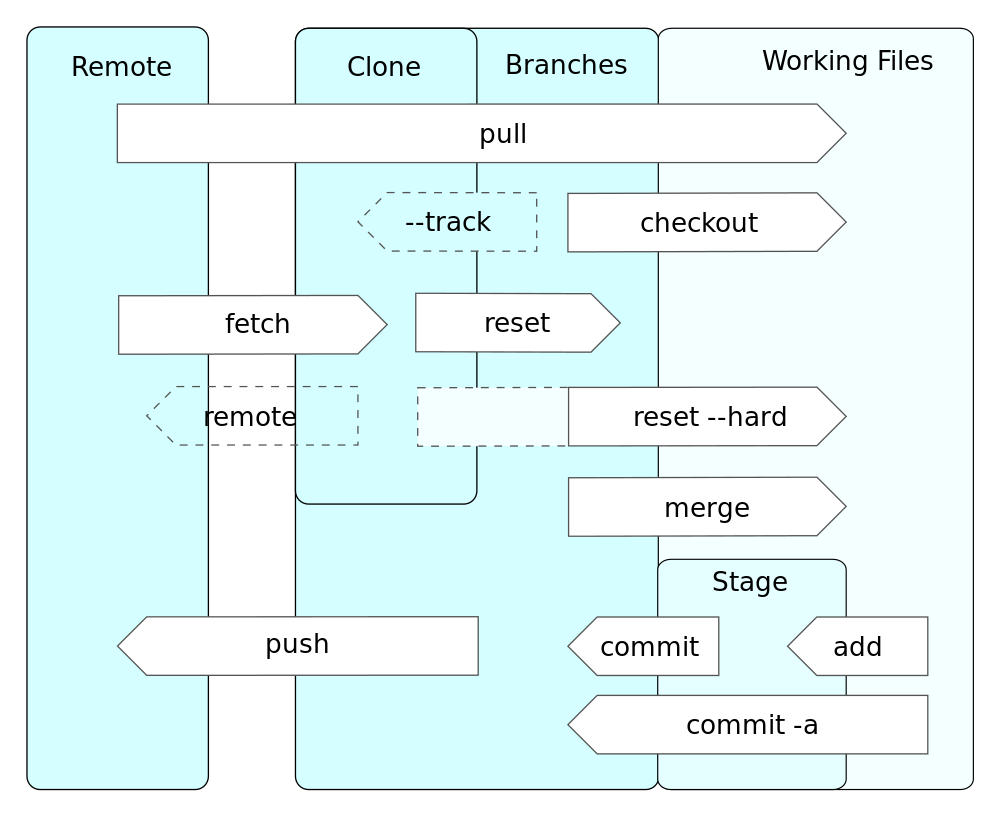
上面兩張圖的方向剛剛好相反喔!參考的時候請注意個別的項目。基本上,你要知道的,就是工作目錄、本地端 .git 目錄、遠端權威容器目錄這三個關係即可。 Staget 或暫存,指的就是本地容器的類似快取 (你正在運作的資料與最近一次 commit 之間的差異)!
- 本地容器的開發行為:其實本地端開發跟之前的章節介紹的一模一樣,完全是 git commit 而已。
我們假設還需要增加第六堂課程的內容,所以這樣增加看看:
$ whoami
student

$ cd ~/www
$ mkdir unit6
$ echo "i am unit 6" > unit6/index.php
$ vim index.html
        <li><a href='unit6'>第六章作業</a></li>

$ git status
On branch master
Your branch is up to date with 'origin/master'.

Changes not staged for commit:
  (use "git add <file>..." to update what will be committed)
  (use "git checkout -- <file>..." to discard changes in working directory)

        modified:   index.html

Untracked files:
  (use "git add <file>..." to include in what will be committed)

        unit6/

no changes added to commit (use "git add" and/or "git commit -a")

$ git add -A
$ git commit -a -m 'add unit 6 homework'
[master c6f7f19] add unit 6 homework
 2 files changed, 2 insertions(+)
 create mode 100644 unit6/index.php

$ git log
commit c6f7f19498f37b15d1ab72369081762f608d237f (HEAD -> master)
Author: VBird Tsai <student@localhost>
Date:   Sun Oct 4 08:17:22 2020 +0800

    add unit 6 homework

commit 20a16c25d5876d0a9fcb034bffa4f63d92920bd2 (origin/master, origin/HEAD)
Merge: 9b3ee0f aa8808e
Author: VBird Tsai <dmtsai@mail.ksu.edu.tw>
Date:   Sat Oct 3 07:56:23 2020 +0800

    Merge branch 'hw/unit2'
....
你可以清楚的發現到,遠端的 master (origin/master) 與本地端的 master 已經不一樣,看起來本地端的似乎比較新喔! - 遠端容器的名稱定義: origin
- 一般來說,在 git 底下,預設的遠端容器名稱都會稱呼為 origin ,這個是預設值。基本上,也確實不太建議修改它。
所以,如果當你下達 git show-branch 時,就會出現這樣的結果:
$ git show-branch -a
* [master] add unit 6 homework
 ! [origin/HEAD] Merge branch 'hw/unit2'
  ! [origin/hw/unit1] add class1 homework
   ! [origin/hw/unit2] add one file
    ! [origin/master] Merge branch 'hw/unit2'
-----
*     [master] add unit 6 homework
--  - [origin/HEAD] Merge branch 'hw/unit2'
*+ ++ [origin/hw/unit2] add one file
--  - [origin/HEAD^] add homework class1 to master
*++ + [origin/hw/unit1] add class1 homework
*+ ++ [origin/HEAD~2] add homework unit2
*+ ++ [origin/HEAD~3] add homework unit2
*++++ [origin/HEAD~4] add tmp/ ignore
上面的訊息顯示各個分支,基本上,出現 origin 的,大部分就是在遠端容器上面的分支,其中 origin/HEAD 應該就是目前最新的。 本地端則是 master 為最新喔! - 更改預設的 origin 名稱:基本上,不建議修改啦!不過,我們可以來玩一下!
$ git remote rename origin server
$ git show-branch -a
* [master] add unit 6 homework
 ! [server/HEAD] Merge branch 'hw/unit2'
  ! [server/hw/unit1] add class1 homework
   ! [server/hw/unit2] add one file
    ! [server/master] Merge branch 'hw/unit2'
-----
....

$ git remote rename server origin
# 記得最後請改回來!不要惡搞啊!哈哈哈!
- 一般來說,在 git 底下,預設的遠端容器名稱都會稱呼為 origin ,這個是預設值。基本上,也確實不太建議修改它。
所以,如果當你下達 git show-branch 時,就會出現這樣的結果:
- 開始將你變更的資料推播到 origin 這個權威容器中:
$ git push Enumerating objects: 7, done. Counting objects: 100% (7/7), done. Delta compression using up to 2 threads. Compressing objects: 100% (3/3), done. Writing objects: 100% (5/5), 406 bytes | 406.00 KiB/s, done. Total 5 (delta 2), reused 0 (delta 0) To /srv/myproject/roothtml.git/ 20a16c2..c6f7f19 master -> master $ git log commit c6f7f19498f37b15d1ab72369081762f608d237f (HEAD -> master, origin/master, origin/HEAD) Author: VBird Tsai
你可以發現,很快的,遠端容器與本地容器已經同步了!讓我們來確認一下本地端與權威容器的 flag 是否相同呢?$ git ls-remote From /srv/myproject/roothtml.git/ c6f7f19498f37b15d1ab72369081762f608d237f HEAD 780235faf99eb3eff46d5b8b59f567f6eb5c80ea refs/heads/hw/unit1 aa8808ed0bb942376a0c4cfe8131a23e2bddd0bf refs/heads/hw/unit2 c6f7f19498f37b15d1ab72369081762f608d237f refs/heads/master 6c2760cb79bab3a279240bceb9d65e194e5678cc refs/tags/V0.2 1b0319971db9a8c2327a8283faf61498151dc0d6 refs/tags/V0.2^{}
仔細比對一下,你會發現,遠端權威容器的 HEAD 確實已經跟我們的最新的 commit 相同 flag 喔! - 實做練習:
- 事實上,我們前一個練習已經建立了 prousera 同步管理 /srv/myproject/roothtml.git 的任務,現在, 請以 prousera 的身份,進入到 ~/www 專案目錄內,然後觀察 origin 與本地端容器是否已經有差異了?
- 嘗試更新 (update) 參照資料,並同步更新 (pull) 。
- 嘗試做出第 7 章的作業資料,然後更新上傳到權威容器上面。
- 轉回 student 的身份,然後使用『 git log 』與『 git ls-remote 』看看 master 的 flag 是否相同?
- 使用 stutdent 的身份,進行 git remote update 以及 git pull 來處理同步的行為。
- 結論:當你要開發時,請務必記得查看本地端與遠端容器是否同步的問題喔!
分支的應用
事實上,權威容器也能夠有分支的!只是,有可能這些分支會被刪除,或者是額外新增!不論理由為何, 有時候分支的管理也是需要學一學的。老實說,分支與本地端容器的分支管理似乎也差不多!只是放置於權威容器就是了。
- 遠端分支的建立:
建立遠端分支,可以先從本地端建立分支之後,加以上傳來處理即可。舉例來說,我們已經建立了第六課的作業, 但是卻發現到第四課作業在上次建立後被刪除了,因此,想要重建第四課的作業情境。應該這樣做:
$ whoami
student

$ cd ~/www
$ git log
commit c6f7f19498f37b15d1ab72369081762f608d237f (HEAD -> master, origin/master, origin/HEAD)
Author: VBird Tsai <student@localhost>
Date:   Sun Oct 4 08:17:22 2020 +0800

    add unit 6 homework

commit 20a16c25d5876d0a9fcb034bffa4f63d92920bd2
Merge: 9b3ee0f aa8808e
Author: VBird Tsai <dmtsai@mail.ksu.edu.tw>
Date:   Sat Oct 3 07:56:23 2020 +0800

    Merge branch 'hw/unit2'
.....

$ git branch hw/unit4 20a16c
$ git branch
  hw/unit4
* master

$ git checkout hw/unit4
Switched to branch 'hw/unit4'

$ git branch
* hw/unit4
  master

$ git push
fatal: The current branch hw/unit4 has no upstream branch.
To push the current branch and set the remote as upstream, use

    git push --set-upstream origin hw/unit4

$ git push --set-upstream origin hw/unit4
$ git ls-remote
From /srv/myproject/roothtml.git/
c6f7f19498f37b15d1ab72369081762f608d237f        HEAD
780235faf99eb3eff46d5b8b59f567f6eb5c80ea        refs/heads/hw/unit1
aa8808ed0bb942376a0c4cfe8131a23e2bddd0bf        refs/heads/hw/unit2
20a16c25d5876d0a9fcb034bffa4f63d92920bd2        refs/heads/hw/unit4
c6f7f19498f37b15d1ab72369081762f608d237f        refs/heads/master
6c2760cb79bab3a279240bceb9d65e194e5678cc        refs/tags/V0.2
1b0319971db9a8c2327a8283faf61498151dc0d6        refs/tags/V0.2^{}

$ git checkout master
這樣就處理好了分支的上傳!也就是說,你得要在本地端先進行分支建立後,才能上傳到權威裸容器上頭囉! - 遠端容器分支的下載運作:
假設 student 這個帳號只是建立了分支而已,他要他的同伴 prousera 繼續開發,因此,prousera 需要開始建立她自己本地端的 hw/unit4 這個分支才行。基本上,可以這樣做的:
$ whoami
prousera

$ cd ~/www
$ git remote update

$ git branch -a
* master
  remotes/origin/HEAD -> origin/master
  remotes/origin/hw/unit1
  remotes/origin/hw/unit2
  remotes/origin/hw/unit4
  remotes/origin/master

$ git checkout hw/unit4
Switched to branch 'hw/unit4'
Your branch is up to date with 'origin/hw/unit4'.

$ git log
commit 20a16c25d5876d0a9fcb034bffa4f63d92920bd2 (HEAD -> hw/unit4, origin/hw/unit4)
Merge: 9b3ee0f aa8808e
Author: VBird Tsai <dmtsai@mail.ksu.edu.tw>
Date:   Sat Oct 3 07:56:23 2020 +0800

    Merge branch 'hw/unit2'

commit aa8808ed0bb942376a0c4cfe8131a23e2bddd0bf (origin/hw/unit2)
Author: VBird Tsai <dmtsai@mail.ksu.edu.tw>
Date:   Sat Oct 3 07:56:03 2020 +0800

    add one file
....
看起來目前的狀況是正常的!沒啥大問題!確定轉到 hw/unit4 這個分支了! - 分支處理完畢,上傳最新實做分支:
跟前面的幾個範例一樣,假設這個分支是暫時的,用來將之前沒有完成的 bug 或作業完成,完成之後得要整合到 master 主線去, 所以,我們使用 prousera 繼續後面的實做流程看看:
$ whoami
prousera

$ mkdir unit4
$ echo "this is unit4" > unit4/index.php
$ vim index.html
        <li><a href='unit4'>第四章作業</a></li>

$ git add -A
$ git commit -a -m 'add unit4 homework'
[hw/unit4 28e67dd] add unit4 homework
 2 files changed, 2 insertions(+)
 create mode 100644 unit4/index.php

$ git push origin hw/unit4
- 合併整合分支:
繼續使用 prousera 的身份進行後續分支的合併行為看看:
$ git checkout master
Switched to branch 'master'
Your branch is up to date with 'origin/master'.

$ git merge hw/unit4
Auto-merging index.html
CONFLICT (content): Merge conflict in index.html
Automatic merge failed; fix conflicts and then commit the result.

$ vim index.html
        <li><a href='unit6'>第六章作業</a></li>
        <li><a href='unit4'>第四章作業</a></li>
        <li><a href='unit2'>第二章作業</a></li>
        <li><a href='unit1'>第一章作業</a></li>

$ git commit -a -m 'merge unit4'
[master 24f72c5] merge unit4

$ git push
Enumerating objects: 7, done.
Counting objects: 100% (7/7), done.
Delta compression using up to 2 threads.
Compressing objects: 100% (3/3), done.
Writing objects: 100% (3/3), 343 bytes | 343.00 KiB/s, done.
Total 3 (delta 2), reused 0 (delta 0)
To /srv/myproject/roothtml.git
   c6f7f19..24f72c5  master -> master
這樣就完成了一個遠端分支建立、分支開發與分支合併的動作了。 - 分支的刪除:
分支建立完畢,我們的分支大部分都只是用來補充過去忘記實做的範本,現在,可以嘗試將不重要的分支刪除看看。 另外,我們假設這個專案的主要管理員是 student,因此,現在請切換到 student 進行後續的行為:
$ whoami
student

$ cd ~/www
$ git log
commit c6f7f19498f37b15d1ab72369081762f608d237f (HEAD -> master, origin/master, origin/HEAD)
Author: VBird Tsai <student@localhost>
Date:   Sun Oct 4 08:17:22 2020 +0800

    add unit 6 homework
......

$ git ls-remote
From /srv/myproject/roothtml.git/
24f72c570a22bb789181643c2897d702203166d7        HEAD
780235faf99eb3eff46d5b8b59f567f6eb5c80ea        refs/heads/hw/unit1
aa8808ed0bb942376a0c4cfe8131a23e2bddd0bf        refs/heads/hw/unit2
28e67dd5545e37e1dabcd5c1438c7da9848006b5        refs/heads/hw/unit4
24f72c570a22bb789181643c2897d702203166d7        refs/heads/master
6c2760cb79bab3a279240bceb9d65e194e5678cc        refs/tags/V0.2
1b0319971db9a8c2327a8283faf61498151dc0d6        refs/tags/V0.2^{}
# 看起來就不像是最新的!所以,需要來更新一下!

$ git remote update
Fetching origin
remote: Enumerating objects: 12, done.
remote: Counting objects: 100% (12/12), done.
remote: Compressing objects: 100% (6/6), done.
remote: Total 8 (delta 4), reused 0 (delta 0)
Unpacking objects: 100% (8/8), done.
From /srv/myproject/roothtml
   c6f7f19..24f72c5  master     -> origin/master
   20a16c2..28e67dd  hw/unit4   -> origin/hw/unit4
# git 報告說, origin/master 與 origin/hw/unit 都有更新過!

$ git pull
Updating c6f7f19..24f72c5
Fast-forward
 index.html      | 1 +
 unit4/index.php | 1 +
 2 files changed, 2 insertions(+)
 create mode 100644 unit4/index.php

$ git branch -a
  hw/unit4
* master
  remotes/origin/HEAD -> origin/master
  remotes/origin/hw/unit1
  remotes/origin/hw/unit2
  remotes/origin/hw/unit4
  remotes/origin/master

$ git branch -d hw/unit4
Deleted branch hw/unit4 (was 20a16c2).

$ git push origin --delete hw/unit4
To /srv/myproject/roothtml.git/
 - [deleted]         hw/unit4

$ git branch -a
* master
  remotes/origin/HEAD -> origin/master
  remotes/origin/hw/unit1
  remotes/origin/hw/unit2
  remotes/origin/master
刪除遠端的分支,也是需要透過 git push 才可以的!這樣就完成了相關的動作了! - 實做練習:
- 繼續使用 student 的身份,刪除不重要的 hw/unit1, hw/unit2 等遠端容器的分支紀錄
- 用 student 的身份,啟用另一個新的分支,分支建立於目前的 master 分支上,作為第 10 章作業的分支系統
- 進入 hw/unit10 分支,然後建立分支作業,然後上傳到遠端容器上的新分支。處理完畢之後,讓 student 回歸到 master 分支即可停止。
- 假設新分支要給 prousera 確認無誤,因此,切換到 prousera 身份,然後下載 hw/unit10 分支, 並且換到該分支,看看有沒有問題,如果沒有問題,回到原本的 master 主線上,然後進行合併, 合併成功後,上傳到遠端容器上。
- student 更新到最新的版本上,然後刪除 hw/unit10 分支。
遠端伺服器
上面談到的遠端權威容器,大致上都還是在同一部系統上面的不同用戶間的處理,那如果每個用戶的系統都在不同機器上, 那就得要透過許多不同的協定來處理了。基本上,有 NFS 檔案系統協定、git 本身的協定、ssh 協定以及 http, https 協定等。 其中 http 與 https 大部分都是單向的,也就是只能從 server 上面抓下來 (git pull, git clone), 而 ssh 又似乎是最標準的協定,因此目前大部分的 git 內網通常直接使用 ssh 而已。
- 目前掌握的伺服器狀態:
基本上,目前你掌握的兩部主機環境其實有點類似底下這樣:
Internet ---WAN--- [ens3] server [ens7] ---LAN--- [ens3] client
也就是說,Server 有兩張以上的界面,其中可以對外的,是 ens3 這個界面,而 client 的 ens3 必須要透過 server 的 ens7 才能夠上網。 現在,先讓我們處理一下 server 的環境。 - 伺服器的設定值:
針對外部界面 ens3,我們外部界面使用的網路參數假定如下:
- IP addr: 192.168.40.*/24
- gateway: 192.168.40.254
- DNS: 120.114.100.1, 168.95.1.1
- hostname: gitserver*.ksu
針對內部界面 ens7,我們使用的網路參數如下:
- IP addr: 172.17.*.254/24
- 用戶端的設定值:
- IP addr: 172.17.*.1/24
- gateway: 172.17.*.254
- DNS: 120.114.100.1, 168.95.1.1
- hostname: gitclient*.ksu
- 伺服器端的防火牆狀態:
- 因為要提供用戶端使用 IP 偽裝,因此,在伺服器端的防火牆需要啟用 IP 偽裝的 NAT 伺服器設定,所以需要啟用內部與外部的領域 (zone):
// 先來更改內 (internal) 與外 (external) 的領域對應的網路界面資訊
# firewall-cmd --get-active-zones
public
  interfaces: ens3 ens7

# nmcli connection modify ens3 connection.zone external  # 對外
# nmcli connection modify ens7 connection.zone internal  # 對內

# firewall-cmd --get-active-zones
external
  interfaces: ens3
internal
  interfaces: ens7
# 請注意一下, external 與 internal 是有意義的名稱,似乎不能亂調整喔!
- 開始啟用 IP 偽裝,意思是,所有從 ens3 出去的封包,全部偽裝成為 ens3 的 IP 之意。
# firewall-cmd --zone=external --add-masquerade --permanent
# firewall-cmd --reload
這樣就搞定了!相當簡單!
- 因為要提供用戶端使用 IP 偽裝,因此,在伺服器端的防火牆需要啟用 IP 偽裝的 NAT 伺服器設定,所以需要啟用內部與外部的領域 (zone):
- 用戶端 (gitclient*) 設定使用者帳號與相關連線機制:
- 假設 client 上面剛剛好也有 student 這個帳號,此帳號會引用 giserver 的資訊,亦即會用到 ssh://student@gitserver/srv/myproject/roothtml.git
的所在資料。那麼可以這樣做:
$ whoami; hostname
student
gitclient200.ksu

$ vim /etc/hosts
172.17.200.254  gitserver200.ksu gitserver200 gitserver

$ git clone ssh://student@gitserver/srv/myproject/roothtml.git www
Cloning into 'www'...
The authenticity of host 'gitserver (172.17.200.254)' can't be established.
ECDSA key fingerprint is SHA256:waLgFyX/O5YwIlj939NQAnu16Wt5pM2mKVp8NFDGfCM.
Are you sure you want to continue connecting (yes/no/[fingerprint])? yes
Warning: Permanently added 'gitserver,172.17.200.254' (ECDSA) to the list of known hosts.
student@gitserver's password: <==這裡輸入密碼
remote: Enumerating objects: 57, done.
remote: Counting objects: 100% (57/57), done.
remote: Compressing objects: 100% (42/42), done.
remote: Total 57 (delta 20), reused 0 (delta 0)
Receiving objects: 100% (57/57), 4.70 KiB | 4.70 MiB/s, done.
Resolving deltas: 100% (20/20), done.

$ git ls-remote
student@gitserver's password: <==這裡輸入密碼
From ssh://student@gitserver/srv/myproject/roothtml.git
24f72c570a22bb789181643c2897d702203166d7        HEAD
780235faf99eb3eff46d5b8b59f567f6eb5c80ea        refs/heads/hw/unit1
aa8808ed0bb942376a0c4cfe8131a23e2bddd0bf        refs/heads/hw/unit2
24f72c570a22bb789181643c2897d702203166d7        refs/heads/master
6c2760cb79bab3a279240bceb9d65e194e5678cc        refs/tags/V0.2
1b0319971db9a8c2327a8283faf61498151dc0d6        refs/tags/V0.2^{}

$ git config -l
core.repositoryformatversion=0
core.filemode=true
core.bare=false
core.logallrefupdates=true
remote.origin.url=ssh://student@gitserver/srv/myproject/roothtml.git
remote.origin.fetch=+refs/heads/*:refs/remotes/origin/*
branch.master.remote=origin
branch.master.merge=refs/heads/master
之後你就可以跟在本機上面進行所有動作一模一樣了! - 增加 ssh 的金鑰:因為每次都要輸入密碼,操作起來非常不方便~所以,你可以自己增加自己的金鑰系統來處理這件事!
$ ssh-keygen

$ ssh-copy-id -i ~/.ssh/id_rsa.pub student@gitserver
這樣,未來你在 www 的 git 目錄中,就可以直接連上伺服器操作了!就跟在本機系統工作一樣。
- 假設 client 上面剛剛好也有 student 這個帳號,此帳號會引用 giserver 的資訊,亦即會用到 ssh://student@gitserver/srv/myproject/roothtml.git
的所在資料。那麼可以這樣做:
- 實做練習:
- 讓 gitclient 上面的 prouserb 這個帳號, clone 來自 gitserver 的 /srv/myproject/roothtml.git 的資料
- 讓 prouserb 操作 git 時,不需要輸入 ssh 密碼。
參考資料
- O'REILLY、『版本控制使用 Git - 第二版』、碁峰出版社
- https://medium.com/design-muffin/新手能理解的-git-github-常見用法-550f276ce35f
- https://gitbook.tw/interview
- https://zh.wikipedia.org/wiki/Git
- 2020/10/04:在中秋假期除了烤肉之外,就是在構思怎麼產生一些比較有利理解的範例...