
第 08 章 - 使用 arduino nano 33 IoT 模組
上次更新日期 2022/11/14
基本上,arduino 上面接感測器之後,其數據應該要發送到伺服器上面才對。而 arduino 通常會放置到某些空間, 在該空間應該不會有線路直接連線到伺服器的!所以,我們應該要給 arduino 一些無線通訊設備才對。無限通訊有非常多種, 我們這邊先使用藍芽來處理看看。
學習目標:
- 認識藍芽模組
- 使用 Android 手機測試配對藍芽
- 使用樹莓派派對藍芽模組
- 使用 SoftwareSerial 進行資料傳輸
- 使用樹莓派透過藍芽控制 arduino
8.1: arduino nano 33 IoT 開發板
為了解決 IoT 所需要的無線通訊,包括藍芽、wifi 等,於是 arduino 推出了 arduino nano 33 IoT 版本,內建了 4.2 版的藍芽, 以及 wifi 模組,你不用再額外去購買一堆零件,直接將所有的元件整合了!底下的連結就是這個 IoT 版本的說明:
- 詳細的說明文件: https://docs.arduino.cc/hardware/nano-33-iot
- 購買的產品資料: https://store.arduino.cc/products/arduino-nano-33-iot (有 PWM 腳位說明)
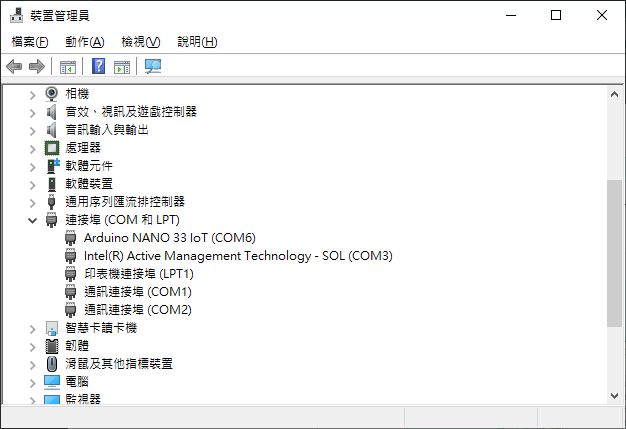
基本上,外觀跟 arduino nano 幾乎一模一樣,只是 USB 的接頭有改變,事實上,連處理器核心都不同了!因此,在裝置管理員裡面的名稱看起來是不一樣的! 而且我們得要安裝驅動程式才行!根據上面連結的內容,我們先來針對 1.8 版本的 IDE 環境進行驅動程式的安裝。
- 安裝 IDE 需要的驅動程式
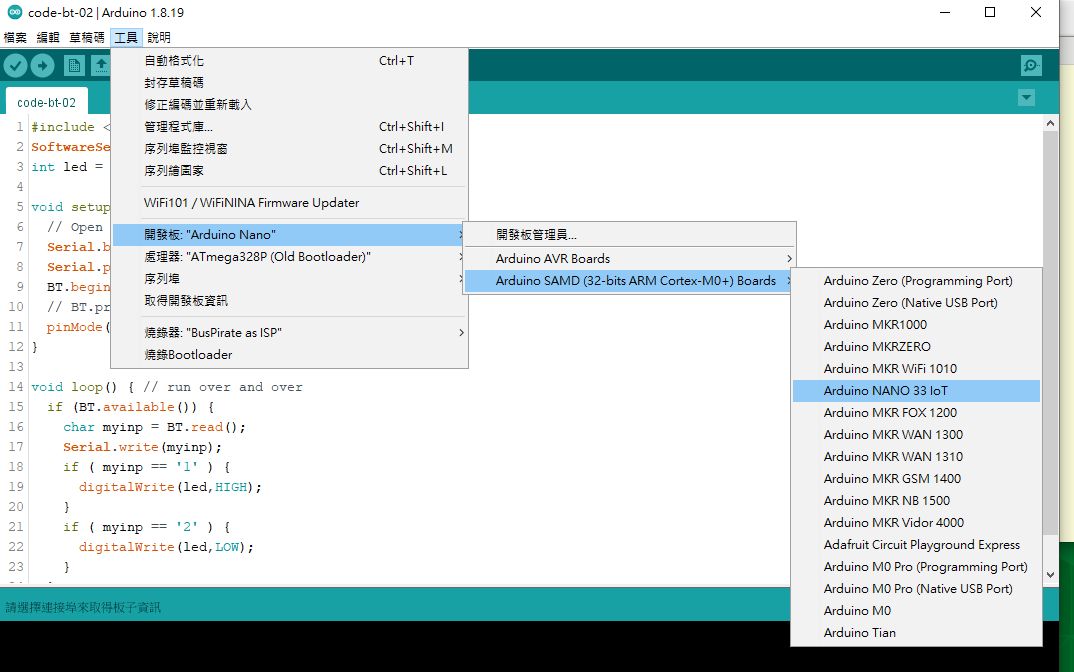
開啟 IDE 界面,如果一切順利,IDE 界面的左下角,應該就會提示你需要安裝新的板子的驅動程式。如果沒有,或者是你不小心略過了, 那也沒關係,來到『工具』、『取得開發板資訊』之後,再次進入『工具』、『開發板:Arduino Nano』、『開發板管理員』, 在出現的新視窗,搜尋『nano iot』,就會出現一個名為『Arduino SAMD Boards』字樣的版本,在裡面的說明,就會提到 arduino nano 33 IoT 的硬體! 安裝該套件就對了。不過,該套件的下載資料量挺大,好幾百 MB 的容量,所以會消耗你一點時間,請稍待!
整個流程安裝完畢之後,在你 windows 的裝置管理員底下的『連接埠 (COM 和 LPT)』當中,才會順利顯示出『Arduino NANO 33 IoT (COM6)』之類的字樣! 否則,一開始顯示的資訊,應該不會是 Arduino 的板子狀態!這點可以作為一個驅動程式是否安裝妥當的判斷!
接下來繼續回到 IDE 的環境,要選擇正確的開發板了!來到『工具』、『開發板: arduino Nano』、『Arduino SAMD (32-bits ARM Cortex-M0+) Boards』、『Arduino NANO 33 IoT』,這樣選擇好你的開發板,然後再到『工具』、『序列埠』去取得正確的序列埠, 這樣,你的 IDE 環境,就算是安裝妥當了!大致上就是這樣!

- 第一隻範例程式
基本上,每一個 arduino 板子上面,除了電源燈的 LED 插電就亮之外,還有其他的 LED 燈存在才對。以 arduino nano 來說, 預設板子上面的 LED 燈號控制,透過的就是 pin 13。不過,比較新的板子,其實可以使用『LED_BUILTIN』這個內建變數來處理即可! 現在,請到『檔案』、『範例』、『01.Basics』、『Blink』抓出這個範本檔,將 delay 內容從 1000 修改成 100, 不用儲存,直接上傳,測試是否能夠順利上傳!如果一切順利,你的板子上面那顆 LED 燈,就會 0.1 秒閃爍一次!每次亮 0.1 秒囉! 這就代表你可以開始控制 arduino nano 33 IoT 了!
現在,請打開之前寫過得範本 code-led-1 這隻程式,然後,根據程式碼的設計,將你的麵包板、 LED 燈按照程式中的說明處理! 這隻程式有點像這樣:
int led = 5;
void setup() {
  pinMode(led, OUTPUT);
}

void loop() {
  digitalWrite(led,HIGH);
  delay(1000);
  digitalWrite(led,LOW);
  delay(1000);
}
將它上傳到開發板上面,你應該要看到 LED 燈號閃爍!這樣就可以跟外界互動了!
8.2: 使用內建感測器 (IMU)
從產品資訊當中,我們可以發現 arduino nano 33 IoT 已經內建一個名為 LSM6DS3 的感測器,這個感測器內部已經含有三軸加速器, 所以,不用額外添加三軸加速器了!只是,得要先安裝 LSM6DS3 的模組才行!請打開 IDE 程式,從『草稿碼』、『匯入程式庫』、『管理程式庫』, 搜尋關鍵字『 LSM6DS3 』,就會出現『Arduino_LSM6DS3』模組,請將它安裝起來!
- 取得三軸加速器數據
安裝完畢之後,在『檔案』、『範例』、『Arduino_LSM6DS3』、『SimpleAccelerometer』打開,程式碼會有點像底下這樣:
#include <Arduino_LSM6DS3.h>

void setup() {
  Serial.begin(9600);
  while (!Serial);

  if (!IMU.begin()) {
    Serial.println("Failed to initialize IMU!");

    while (1);
  }

  Serial.print("Accelerometer sample rate = ");
  Serial.print(IMU.accelerationSampleRate());
  Serial.println(" Hz");
  Serial.println();
  Serial.println("Acceleration in g's");
  Serial.println("X\tY\tZ");
}

void loop() {
  float x, y, z;

  if (IMU.accelerationAvailable()) {
    IMU.readAcceleration(x, y, z);

    Serial.print(x);
    Serial.print('\t');
    Serial.print(y);
    Serial.print('\t');
    Serial.println(z);
  }
  delay(500);
}
因為偵測速度挺快的,建議如上所示,加個 delay 在裡面,顯示的數據會比較緩慢一點點。燒錄上傳之後,你就可以收到 X, Y, Z 的三軸變化資料了!如果覺得數據太過複雜,關掉序列埠,從『工具』、『序列繪圖家』,也可以從圖形界面看到數據的逐時變化, 透過觀察 IDE 的自動繪圖也是挺有趣的!
- 取得陀螺儀數據
這個 IMU (Inertial Measurement Unit, IMU, 慣性測量單元) 除了三軸加速之外,也提供陀螺儀的數據! 同樣從『檔案』、『範例』、『Arduino_LSM6DS3』、『SimpleGyroscope』打開,程式碼會有點像底下這樣:
#include <Arduino_LSM6DS3.h>

void setup() {
  Serial.begin(9600);
  while (!Serial);

  if (!IMU.begin()) {
    Serial.println("Failed to initialize IMU!");
    while (1);
  }

  Serial.print("Gyroscope sample rate = ");
  Serial.print(IMU.gyroscopeSampleRate());
  Serial.println(" Hz");
  Serial.println();
  Serial.println("Gyroscope in degrees/second");
  Serial.println("X\tY\tZ");
}

void loop() {
  float x, y, z;

  if (IMU.gyroscopeAvailable()) {
    IMU.readGyroscope(x, y, z);
    Serial.print(x);
    Serial.print('\t');
    Serial.print(y);
    Serial.print('\t');
    Serial.println(z);
  }
  delay(500);
}
同樣的,你也可以從『序列繪圖家』得到連續的數據資料,雖然這個資料改變的幅度非常大...
8.3: 藍芽模組
arduino nano 與 arduino nano 33 IoT 的價格差了好幾倍!目前 IoT 開發板已經接近 1000 台幣一塊,相對於不到 100 塊的單純 nano 板子來說, 確實是有比較貴。比較貴的原因是,所有的無限通訊元件已經都結合在上面了,當然就比較貴!這個小節,我們來聊聊藍芽! IoT 板子上面的藍芽版本目前是 4.2 版本,詳細可以參考前一小節的連結。簡單的來說,與 HC-06 不同的是,IoT 版本的藍芽支援低耗電功能, 就是所謂的 Bluetooth Low Energy (BLE) 功能,這功能可以傳輸比較多進階的資料,我們可以拿該功能來讀取 RSSI 訊號, 可能可以作為進一步研究的依據。
要使用 BLE 得要安裝 ArduinoBLE 模組才行,詳情可以參考底下的連結,現在,請將 ArduinoBLE 模組安裝起來:『草稿碼』、 『匯入程式庫』、『管理程式庫』,在視窗當中輸入『 arduinoBEL』關鍵字,就會出現該模組,安裝完畢就關閉好。
- 由本身 USB 序列埠列出 arduino nano 33 IoT 的藍芽位址
就跟前一章一樣,不知道我們自己的開發板藍芽位址,可能就比較難以連結到樹莓派上面去!因此,第一隻藍芽小程式, 我們讓 arduino 33 自己告知我們它的藍芽位址!簡單的處理方式如下: (假設檔名就稱為 code-ble-showaddress 即可)
#include <ArduinoBLE.h>

void setup() {
  Serial.begin(9600);
  while (!Serial);

  // begin initialization
  if (!BLE.begin()) {
    Serial.println("starting Bluetooth® Low Energy module failed!");
    while (1);
  }

  // set advertised local name and service UUID:
  BLE.setLocalName("Nano 33 IoT");
  String address = BLE.address();
  Serial.println(address);
}

void loop() {
}
要啟用 arduino nano 33 的藍芽,我們可以使用 ArduinoBLE 模組,所以上面第一行一定要加入!然後設定好序列埠的傳輸鮑率, 加上啟動 BLE 的 BLE.begin() 函數,設計 BLE.address() 的函數應用,最終列出到序列埠即可。燒錄上傳之後, 應該就可以抓到你的藍芽位址了。鳥哥這邊的測試,藍芽位址為『 4c:eb:d6:4d:61:fa 』,這個得要稍微注意一下, 免得在教室的環境底下搞錯了裝置喔!
- 外圍設備:準備讓藍芽控制 LED 燈的範例程式
在 BLE 的藍芽環境中,基本上數據、指令傳輸分為中央設備與外圍設備 (central/peripheral),有點像是 server/client 的感覺。 因為 BLE 裡面很多的傳輸數據需要你手動自行設定,並且需要啟動傳輸之後,才有辦法進行傳輸!不像 HC-06, 插電就會自動進行廣播...因此,我們需要燒錄並上傳 BLE 的程式碼到 nano 33 IoT 板子上之後, 才有辦法透過樹莓派去掃描到這個藍芽裝置喔!
我們的開發板目的是收集資料用,並不是資料處理中心,因此主要的角色定位在 peripheral 上面。現在,模擬一個狀況, 你要透過樹莓派的 python 對你的 arduino nano 33 IoT 進行 LED 燈光的控制~這時,你得要讓 arduino 成為可以發送藍芽訊號的週邊裝置才行。 你可以透過『檔案』、『範例』、『ArduinoBLE』、『Peripheral』、『LED』的範例程式碼進行修改,修改的成果可以有點像底下這樣:
// 程式碼檔名可以是 code-ble-led 即可
// 自定義一個服務與特徵資料列表
#include <ArduinoBLE.h>
BLEService myService("19B10000-E8F2-537E-4F6C-D104768A1214");
BLEIntCharacteristic myServiceLED("19B10001-E8F2-537E-4F6C-D104768A1214", BLERead | BLEWrite);

// LED 的腳位在 D5
int ledPin = 5;

void setup() {
  // 設定好序列埠,以及 LED 腳位
  Serial.begin(9600);
  pinMode(ledPin, OUTPUT);

  // 初始化 BLE 藍芽
  if (!BLE.begin()) {
    Serial.println("starting Bluetooth® Low Energy module failed!");
    while (1);
  }

  // 設定藍芽本身名稱顯示,並設定好要傳輸的資料,本例則是 myServiceLED
  BLE.setLocalName("Nano 33 IoT VBird");
  BLE.setAdvertisedService(myService);
  myService.addCharacteristic(myServiceLED);
  BLE.addService(myService);

  // set the initial value for the characeristic:
  myServiceLED.writeValue(0);

  // 開始廣播上述資料
  BLE.advertise();

  Serial.println("BLE Peripheral started");
}

void loop() {
  // listen for Bluetooth® Low Energy peripherals to connect:
  BLEDevice central = BLE.central();

  // if a central is connected to peripheral:
  if (central) {
    Serial.print("Connected to central: ");
    // print the central's MAC address:
    Serial.println(central.address());

    // while the central is still connected to peripheral:
    while (central.connected()) {
      // if the remote device wrote to the characteristic,
      // use the value to control the LED:
      if (myServiceLED.written()) {
        if ( myServiceLED.value() == 1 ) {   // value is 1
          Serial.println("LED on");
          digitalWrite(ledPin, HIGH);         // will turn the LED on
        }
        if ( myServiceLED.value() == 0 ) {
          Serial.println(F("LED off"));
          digitalWrite(ledPin, LOW);          // will turn the LED off
        }
      }
    }

    // when the central disconnects, print it out:
    Serial.print(F("Disconnected from central: "));
    Serial.println(central.address());
  }
}
我改了一些資料,原始的資料在特徵資料當中使用的傳輸方式為 byte 的傳輸,不過我們需要的資料其實是整數 (因為單純的 1 或 0 而已)。 因此,將特徵資料做了一些變動。如果有需要做其他的不同格式的資料輸入,可以參考底下的幾種連結方式喔:
- BLEBoolCharacteristic(uuid, properties):布林值
- BLECharCharacteristic(uuid, properties):字元
- BLEIntCharacteristic(uuid, properties):整數
- BLEFloatCharacteristic(uuid, properties):浮點數
接下來就可以開始燒錄後上傳,上傳之後,你的開發板就會持續發送 BLE 的訊息!並且等待控制設備 (central) 的管理!
- 使用樹莓派掃描藍芽裝置,並嘗試配對
接下來,先用指令的方式掃描一下藍芽裝置是否存在!掃描的方式也是透過 hcitool 處理即可:
# 單純掃描看看有沒有看到這個裝置而已
$ sudo hcitool lescan
LE Scan ...
.....
4C:EB:D6:4D:61:FA Nano 33 IoT VBird
.....

# 嘗試配對開始;
$ bluetoothctl

[bluetooth]# scan on
[CHG] Controller B8:27:EB:27:51:76 Discovering: yes
[NEW] Device 4C:EB:D6:4D:61:FA Nano 33 IoT VBird
[NEW] Device 74:93:AB:24:D3:73 74-93-AB-24-D3-73

[bluetooth]# pair 4C:EB:D6:4D:61:FA
Attempting to pair with 4C:EB:D6:4D:61:FA
[CHG] Device 4C:EB:D6:4D:61:FA UUIDs: 00001800-0000-1000-8000-00805f9b34fb
[CHG] Device 4C:EB:D6:4D:61:FA UUIDs: 00001801-0000-1000-8000-00805f9b34fb
[CHG] Device 4C:EB:D6:4D:61:FA UUIDs: 19b10000-e8f2-537e-4f6c-d104768a1214
[CHG] Device 4C:EB:D6:4D:61:FA ServicesResolved: yes
[CHG] Device 4C:EB:D6:4D:61:FA Paired: yes
Pairing successful

[Nano 33 IoT VBird]# paired-devices
Device 20:17:03:02:53:55 HC-06
Device 20:17:03:02:34:51 HC-06
Device 4C:EB:D6:4D:61:FA Arduino

[Nano 33 IoT VBird]# info 4C:EB:D6:4D:61:FA
Device 4C:EB:D6:4D:61:FA (public)
        Name: Arduino
        Alias: Arduino
        Paired: yes
        Trusted: no
        Blocked: no
        Connected: yes
        LegacyPairing: no
        UUID: Generic Access Profile    (00001800-0000-1000-8000-00805f9b34fb)
        UUID: Generic Attribute Profile (00001801-0000-1000-8000-00805f9b34fb)
        UUID: Vendor specific           (19b10000-e8f2-537e-4f6c-d104768a1214)

[Nano 33 IoT VBird]# disconnect 4C:EB:D6:4D:61:FA
Attempting to disconnect from 4C:EB:D6:4D:61:FA
[CHG] Device 4C:EB:D6:4D:61:FA ServicesResolved: no
Successful disconnected
[CHG] Device 4C:EB:D6:4D:61:FA Connected: no

[Nano 33 IoT VBird]# remove 4C:EB:D6:4D:61:FA
[Nano 33 IoT VBird]# exit
這樣就可以觀察、可以配對!沒問題!但是 BLE 很特別,你不能在已經配對的情況下使用這個 BLE 的藍芽裝置! 所以,離開 bluetooth 之前,一定要移除配對裝置!也就是說,輸入底下的指令時,不能出現上面的 4C:EB:D6:4D:61:FA 這個裝置名稱!否則等等的 python 程式連線到 BLE 藍芽時,會一直警告『[org.bluez.Error.Failed] Disconnected early』 這樣的字樣!這個問題困擾了鳥哥好一陣子!要注意!要注意!
$ bluetoothctl paired-devices
Device 20:17:03:02:53:55 HC-06
Device 20:17:03:02:34:51 HC-06
# 上面一定不能出現等等你要配對的藍芽裝置!否則等等會無法連線成功!要注意!

$ bluetoothctl scan on
# scan 一定要是 on 的狀態!你可以輸入 [ctrl]-c 中斷沒問題!但是一定要 on 才行!
- 使用 python bleak 模組進行掃描
要使用樹莓派連線到 arduino nano 33 IoT 上,官方也建議可以使用 bleak 模組~同時也會用到 asyncio 模組! 要先安裝模組才行喔!
$ sudo pip install bleak
$ sudo pip install asyncio
如果你知道你的藍芽 BLE 的裝置名稱,只是不曉得它的藍芽位址時,事實上我們可以透過一個名為 bleak 的模組來進行掃描的! 不過要注意的是,因為 BLE 藍芽傳輸得要花費一段時間去等待傳輸完畢,有點類似非同步運作的情況,所以, 你得要透過 asyncio 這個模組來進行一些非同步的運作行為!這個部份會稍微麻煩一點點!底下的 python 程式中, 你幾乎一定要自己定義由 async 所管理的函數,再透過 async 的運作行為來呼叫該函數, 這樣才有辦法進行藍芽 BLE 的處理。
# 程式檔名就稱為 ble-scanner.py 即可!

# 第 1 部份,匯入需要的模組
import asyncio
from bleak import BleakClient
from bleak import BleakScanner

# 第 2 部份,使用 async 定義出相關的函數,名稱為 scanner,重點在 await 那行!
async def scanner():
    print("Scanning BLE device")
    devices = await BleakScanner.discover()
    for dev in devices:
        print(dev.name, dev.address, dev.rssi, dev.metadata)

# 第 3 部份,使用 asyncio 提供的迴圈功能,執行 scanner 函數!
loop = asyncio.get_event_loop()
try:
    loop.run_until_complete(scanner())
except KeyboardInterrupt:
    print('\nReceived Keyboard Interrupt')
finally:
    print('Program finished')
執行之後的成果,會有點像底下這樣:
$ python ble-scanner.py
Scanning BLE device
Nano 33 IoT VBird 4C:EB:D6:4D:61:FA -58 {'uuids': ['19b10000-e8f2-537e-4f6c-d104768..}
....
Program finished
確實找到你的藍芽 BLE 裝置了!上面的藍芽位址很重要!同時,也可以列出訊號強度的 RSSI 喔!功能相當強大的!
- 找出 BLE 的服務與資料列表
如果你忘記了 nano 33 IoT 裡面所設定的服務、特徵列表的 uuid 時,那該如何是好? 沒關係,我們可以透過底下的方式來將特定藍芽位址所放行的服務與特徵列表抓出來!底下的語法算是比較固定的, 尤其是透過 async 的方式來處理時,這得要特別留意!
$ vim ble-getservice.py
import asyncio
from bleak import BleakClient

devaddr = "4C:EB:D6:4D:61:FA"

async def run():
    async with BleakClient(devaddr) as client:
      print("Get BLE device services")
      if client.is_connected:
        services = await client.get_services()
        for service in services:
            print('service', service.handle, service.uuid, service.description)
            chars = service.characteristics
            for char in chars:
                print('  characteristic', char.handle, char.uuid, char.description)

loop = asyncio.get_event_loop()
try:
    loop.run_until_complete(run())
except KeyboardInterrupt:
    print('\nReceived Keyboard Interrupt')
finally:
    print('Program finished')

$ python ble-getservice.py
Get BLE device services
>service 6 00001801-0000-1000-8000-00805f9b34fb Generic Attribute Profile
  characteristic 7 00002a05-0000-1000-8000-00805f9b34fb Service Changed
service 10 19b10000-e8f2-537e-4f6c-d104768a1214 Unknown
  characteristic 11 19b10001-e8f2-537e-4f6c-d104768a1214 Unknown
Program finished
很輕易的就看到兩個我們當初設定的 UUID 了!透過這樣來判斷也是可以的喔!接下來,讓我們抓出 19b10001 那個 UUID 的數值, 因為那個數值就是我們需要的 LED 燈號的處理了!
- 取得 BLE 的特徵列表數值
取得特徵列表數據有許多方式,我們使用不用登出 (disconnect()) 的方式來處理!方式並不難,只是,取得的數據與一般我們認知的數據不同! 這個數據是單純的位元組陣列格式 (bytearray),我們得要透過 struct.unpack 的方式將它抓出來,同時轉成適當的格式才行。 常見的格式可以參考底下的連結,我們只列出一些常用的方式:
- 語法: struct.unpack('格式', 變數名)
- 格式:
- c: char
- b: signed char
- i, 整數
- f, 浮點數
- s, char[]
- 參考:https://docs.python.org/3/library/struct.html#format-characters
你得要知道喔,從 struct.unpack 抓出來的資料都會轉成陣列,所以資料得要使用陣列的方式取出才行! 假設我們只抓出第一個陣列值而已,那就這樣做:
$ vim ble-getchars.py
import asyncio
from bleak import BleakClient
import struct

devaddr = "4C:EB:D6:4D:61:FA"
leduuid = "19b10001-e8f2-537e-4f6c-d104768a1214"

async def run():
    print("Get BLE device value")
    async with BleakClient(devaddr) as client:
      if client.is_connected:
        led_get = await client.read_gatt_char(leduuid)
        ledvalue = struct.unpack('i', led_get)[0]
        print( 'ledvalue: ', ledvalue )

loop = asyncio.get_event_loop()
try:
    loop.run_until_complete(run())
except KeyboardInterrupt:
    print('\nReceived Keyboard Interrupt')
finally:
    print('Program finished')

$ python ble-getchars.py
Get BLE device value
ledvalue:  0
Program finished
這樣就知道目前的 LED 回傳值是 0 喔!你要注意的是,基本上,擷取的數據會是陣列的格式,因此,我們才使用了上面的中括號 [0], 如果有不同的設計,當然以你的設計資料為主。
- 傳輸資料到 BLE 藍芽裝置上
如果要將控制 BLE 裝置,那麼就得要傳輸資料到 BLE 裝置上!這時就得要使用 write_gatt_char 的方式來處理! 處理的方法也不是太困難!我們還是建議使用上面的模式,不要使用 client.connect() 函數! 直接用 async 的方法來處理即可!如下所示:
$ vim ble-writechars.py
import asyncio
from bleak import BleakClient
import struct

devaddr = "4C:EB:D6:4D:61:FA"
leduuid = "19b10001-e8f2-537e-4f6c-d104768a1214"

async def run():
    print("Link to BLE device")
    async with BleakClient(devaddr) as client:
      if client.is_connected:
        while True:
          led_get = await client.read_gatt_char(leduuid)
          ledvalue = struct.unpack('i', led_get)[0]
          if ledvalue == 1:
              print('LED 狀態 ON')
          if ledvalue == 0:
              print('LED 狀態 OFF')
          go = input('你的新選擇 (0, 1, 9): ')
          if go == '0' or go == '1':
              value = struct.pack('i', int(go) )
              await client.write_gatt_char(leduuid, value)
          if go == '9':
              print('離開程式囉!')
              break

loop = asyncio.get_event_loop()
try:
    loop.run_until_complete(run())
except KeyboardInterrupt:
    print('\nReceived Keyboard Interrupt')
finally:
    print('Program finished')

$ python ble-writechars.py
Link to BLE device
LED 狀態 OFF
你的新選擇 (0, 1, 9): 1
LED 狀態 ON
你的新選擇 (0, 1, 9): 1
LED 狀態 ON
你的新選擇 (0, 1, 9): 2
LED 狀態 ON
你的新選擇 (0, 1, 9): 0
LED 狀態 OFF
你的新選擇 (0, 1, 9): 9
離開程式囉!
Program finished
你會發現到你的 BLE 控制的藍芽系統,跟你傳輸的數據變化,會變更你的 LED 燈光!這就是一個合理的互動行為囉!
- 取得藍芽 RSSI 數值
RSSI (Received signal strength indication) 是一個可以判斷距離的訊號強度資料,我們在取得 service 的 python 當中, 曾經呼叫出 RSSI 這個數據。在 ArduinoBLE 模組當中,可以透過 BLE.rssi() 函數來取得兩個裝置之間的 RSSI 訊號! 如果透過增加一個服務識別列表資料,那就可以透過 arduino 直接傳回 RSSI 數據,不用使用 bleak.discover() 來處理裝置資料了! 過程也就會變得比較單純~我們嘗試來寫一個可以持續讀出 RSSI 數據功能的方式,需要同時修改 arduino 與樹莓派的腳本才行! 先來看一下 arduino 的程式應該怎麼寫比較好:
// 檔名就稱為 code-ble-rssi 好了:
#include <ArduinoBLE.h>
BLEService myService("19B10000-E8F2-537E-4F6C-D104768A1214");
BLEIntCharacteristic myServicerssi("19B10001-E8F2-537E-4F6C-D104768A1214", BLERead | BLEWrite);

void setup() {
  // 設定好序列埠,以及 LED 腳位
  Serial.begin(9600);

  // 初始化 BLE 藍芽
  if (!BLE.begin()) {
    Serial.println("starting Bluetooth® Low Energy module failed!");
    while (1);
  }

  // 設定藍芽本身名稱顯示,並設定好要傳輸的資料,本例則是 myServiceChar1
  BLE.setLocalName("Nano 33 IoT VBird");
  BLE.setAdvertisedService(myService);
  myService.addCharacteristic(myServicerssi);
  BLE.addService(myService);

  // set the initial value for the characeristic:
  myServicerssi.writeValue(0);

  // 開始廣播上述資料
  BLE.advertise();
  Serial.println("BLE Peripheral started");
}

void loop() {
  // listen for Bluetooth® Low Energy peripherals to connect:
  BLEDevice central = BLE.central();

  // if a central is connected to peripheral:
  if (central) {
    Serial.print("Connected to central: ");
    // print the central's MAC address:
    Serial.println(central.address());
    // while the central is still connected to peripheral:
    while (central.connected()) {
      int rssi = central.rssi();
      myServicerssi.writeValue(rssi);
    }

    // when the central disconnects, print it out:
    Serial.print(F("Disconnected from central: "));
    Serial.println(central.address());
  }
}
完成之後燒錄上傳。之後來處理樹莓派這邊的 python 程式:
$ vim ble-getrssi.py
import asyncio
from bleak import BleakClient
import struct

devaddr  = "4C:EB:D6:4D:61:FA"
rssiuuid = "19b10001-e8f2-537e-4f6c-d104768a1214"

async def run():
    print("Get BLE device value")
    async with BleakClient(devaddr) as client:
      if client.is_connected:
        while True:
          rssi_bytes = await client.read_gatt_char(rssiuuid)
          rssivalue = struct.unpack('i', rssi_bytes)
          print( 'rssivalue: ', rssivalue[0] )
          sleep(0.5)
    client.disconnect()

loop = asyncio.get_event_loop()
try:
    loop.run_until_complete(run())
except KeyboardInterrupt:
    print('\nReceived Keyboard Interrupt')
finally:
    print('Program finished')

$ python ble-getrssi.py
Get BLE device value
rssivalue:  -57
rssivalue:  -65
rssivalue:  -52
rssivalue:  -61
rssivalue:  -53
不過,不知道是不是我的寫法有問題,在這樣的情況底下,RSSI 的數據變動得很快速!無法得到一個合理的數據~感覺真是傷腦筋~ 但是,總結來說,還是可以透過這樣的方式,將我們的數據慢慢結合處理出來的!
基本上,BLE 還挺麻煩的!寫 python 程式時,如果你的程式最終沒有將連線關閉 (disconnect()) 的話,那這個藍芽裝置, 恐怕就得要重新啟動!否則,就會卡在那邊不動...同時,該藍芽裝置,再也偵測不到!因為該藍芽已經被綁定了... 當你確定你的藍芽還活著,卻怎麼也連不上時,可以按下 arduino nano 33 IoT 的 reset 按鈕 (小小一顆,在板子上)。 應該就可以再次連上了!
8.4: 參考資料
- BLE 藍芽與樹莓派的互動功能:
- 非常完整的 arduino nano 33 IoT 介紹與實務,建議可以花時間好好看一下:
https://dronebotworkshop.com/arduino-nano-33-iot/ - 官網提供的 server/client 連結介紹,有很多原則性的說明,建議也要花時間看看:
https://docs.arduino.cc/tutorials/nano-33-ble-sense/ble-device-to-device - 透過 BLE 在樹莓派與 arduino 間進行溝通:
https://dev.to/chrisdinhnz/raspberry-pi-meet-arduino-arduino-meet-raspberry-pi-lets-talk-bluetooth-le-35mi - 使用 python 透過 BLE 進行 nano BLE 的交流:
https://www.hackster.io/sridhar-rajagopal/control-arduino-nano-ble-with-bluetooth-python-331e33 - Arduino BLE 模組的所有 API 官網提供:
https://www.arduino.cc/reference/en/libraries/arduinoble/
- 非常完整的 arduino nano 33 IoT 介紹與實務,建議可以花時間好好看一下:
- python 的 bleak 模組相關文件:
- 看 ibeacon 的資料,在最後面,搜尋 ibeacon https://docs.particle.io/reference/device-os/bluetooth-le/
- https://developer.apple.com/ibeacon/Getting-Started-with-iBeacon.pdf
- 與樹莓派 bluez 及藍芽 BLE 技術(低耗電) 較相關的幾篇資料:
- 一篇有幫助的碩士論文:https://www.airitilibrary.com/Publication/alDetailedMesh1?DocID=U0002-2502201912135300&PublishTypeID=P003
- Radius Network:https://developer.radiusnetworks.com/2014/12/04/fundamentals-of-beacon-ranging.html
- 簡單的距離公式 (page 36):
http://ir.lib.cyut.edu.tw:8080/bitstream/310901800/35597/1/106CYUT0652008-002.pdf - 低功耗室內藍芽定位:
https://oldweb.icpdas.com/root/news/pactech/pdf/PACTECH_63.pdf